Enable S3 sleep on Lenovo Yoga (IdeaPad) Slim 7 14are05 (and other models too)
Lately, Microsoft has been pushing a new implementation for the way portable computers sleep: instead of the traditional, “deep”, offline sleep, the so-called “modern standby” promises that compatible devices will be able to enter/exit sleep more quickly, and be able to wake up from sleep and notify users for mails etc. In reality, as is usual these days, on some machines, the implementation is lacking, providing only downsides and no real benefit. You’d think disabling the newer method should be easy, but since we are talking about Microsoft here, of course it is not. This article shows the general method, customized for the newish Lenovo Yoga (IdeaPad) Slim 7.
Default sleep states on this laptop
To start off, let’s recap how modern computers do power managements, and more specifically, power states: there are a couple of so-called “sleep states” defined by the ACPI standard:
- S0 - system is operating normally
- S1, S2 - not really a thing
- S3 aka suspend to RAM - CPU activity is paused; the context is maintained by operating the RAM in low power mode
- S4 aka suspend to disk - the computer is entirely off, including the CPU, and memory; the context is maintained by offloading it to the storage (disk)
- S5 - computer is totally off
Traditionally, these states are implemented by all operating systems like so: S3 is called “sleep”, S4 is called “hibernation”, and S5 is called “power off”/”shut down”/”turn off”.
Of course, mobile devices like smartphones do “sleep” totally different. Besides the architectures of the CPUs used being architected for low power operation, as opposed to x86 which is a high performance architecture, and this translating in generally less power usage when idling, the demands from mobile devices are different from those of most computers. Users expect notifications to be pushed in real time, and for this to happen, obviously, a traditional S3-like approach, where CPU activity is suspended and resumed only by external triggers would not make that possible. Thus, mobile devices sleep by carefully reducing CPU activity during this state, and also operating the CPU in a lower power state.
With the recent trend of portable computers and portable smart devices converging, which, in my opinion, is not necessarily a good thing, Microsoft, which at least aims to be a big player in this area, came with an “innovation” that is supposed to address this issue. Because they could not mess with ACPI or how x86 works in general, they came up with a hack that aims to provide a more smartphone-like experience on laptops: S0ix aka “S0 low power idle network connected”. This mode is basically S0 with the OS imposing “strict” restrictions on the tasks executing on the system: in theory, all but a few critical threads should be suspended, with some of those threads still allowed to run but at a reduced frequency providing notifications, mail sync etc. In practice, this is poorly implemented, with results like:
- higher power usage in sleep as opposed to traditional S3 sleep; the CPU still runs, so even with perfect optimization of tasks that it has to run, there is still an inherent power draw
- no real need for “connected standby”; for example, on this laptop, there were simply no applications that benefited from this feature (I set up an Exchange account in the default Windows Mail app, put the computer to “sleep”, sent a mail and received no “ping”, no notification; only when manually waking the laptop, the app would sync and download the mail from the server)
- some users simply do not feel the need for such a feature, in contrast with the immense power draw it puts on the computer as opposed to the traditional method; for example, most people carry the phone with them, the laptop usually remains on the desk or in the bag when not in use, so even though it notifies, there would be no one around to receive those notifications; people would be informed via the phone etc
- the implementation proves to be technically difficult (as most things do these days) for Microsoft; there are numerous reports of people’s computers waking up on their own from modern standby, and then the laptop running normally and overheating in the carrying bag and so on
- there is also one other caveat; poor support on other operating systems (mainly GNU/Linux distributions); GNU/Linux do not really implement this yet, and so when such an OS is used on computers implementing modern standby, sleep merely means “turning off the screen and continuing to run normally”, which naturally equates with a huge power draw as opposed to the classic S3 sleep
So, you’d think, what’s the big deal, “S0ix” is different from S3, why not force Windows to use S3 and that’s it? Well, here’s where Microsoft went insane: even though there is no technical limitation to this (“S0ix” is not a real or newer ACPI power state, it is S0 with questionable power tweaks on the OS side), Microsoft requires that computers implementing S0ix will have their S3 sleep state disabled in the OS. The computer BIOS/UEFI advertises S0ix support via the ACPI table (more details here - the AcpiS0ixPatcher is an EFI application that patches ACPI to add support for advertising S0ix support to Windows OS on any computer). Thus, since Windows anyway disables S3 if S0ix is claimed as supported (which basically involves the BIOS/UEFI provider do nothing at all; S0ix is technically S0, which they anyway implement for normal computer operation; you could think of S0ix as software-mode S3), and Windows still ships on the majority of computers, laptop manufacturers decide to simply disable altogether the BIOS/UEFI mechanism that advertises S3 support, and some do not even implement S3 anymore, or simply leave the generic implementation that’s provided by the BIOS producer in there, which is not really customized to work perfectly with the hardware of the particular model.
I cannot emphasize how bad this is. Instead of a simple method of sleep backed into the firmware, we now get an OS-dependent software implementation that will never be as power efficient as the method it replaces, and further on with questionable results and poor implementations. Now, when you buy a computer and install an OS, you have to do the engineer’s job and reimplement functionality that was standard 2 years ago. Plus, Microsoft, again, as it did with SecureBoot, imposed their poisoning way of doing things: not only is Windows crippled, they crippled the computers themselves with their decision, and in doing so, they crippled other operating systems as well, until some patches and hacks are employed there as well, that may try to alleviate the situation.
A proper fix is tough to get: you need a custom BIOS/UEFI with ACPI that advertises and supports S3. That’s the ideal way. After the backlash, for certain lineups, the OEM provided BIOS updates that added a “sleep style” toggle in the BIOS that offers the following options:
- Windows - ACPI advertises S0ix, aka modern standby
- Linux - ACPI advertises classic S3
Despite their names, both methods are supported in both Windows and GNU/Linux, but how good this work, I told you above.
So, people looking to fix this for newer systems that are plagued by this problem have generally resorted to disassembling the ACPI tables, checking whether S3 is still in there but just softly disabled, removing the lock and seeing whether this results in good operation or not. With GNU/Linux systems, patching the ACPI tables on the fly is trivial, the kernel provides support for doing so at boot. Indeed, I started my research for this guide by following the instructions provided for patching the BIOS/UEFI on this model for Arch Linux, which are described here, which were inspired by similar progress with the Lenovo ThinkPad X1 Yoga (Gen 3) (here). This ThinkPad was fortunately one of the lucky models that were blessed by a BIOS update that added back S3 functionality back via the above mentioned “Windows/Linux” toggle.
Unfortunately, things are not as simple as they’re described there if you run Windows. If this were my laptop, yes, I’d use Arch too, but this laptop’s not mine. It is my brother’s; he, of course, uses Windows 10, I told him that for Chrome and Microsoft Word you don’t need Windows, you don’t need to put up with updates that screwed him as well, but in the meantime, I am still negotiating, with his laptop still running Windows. He asked me to help him with this, look whether there’s any fix, and being conscious that the fix implemented for GNU/Linux is actually OS-agnostic, and also based on my previous experience hackintoshing, I decided I needed a solution for Windows; also, since I was doing this anyway, I decided to do it properly: no SecureBoot disabling, no need to compromise your computer’s security for this. Even though a bit more convoluted, messing with ACPI while still maintaining the chain of trust is possible. This applies to GNU/Linux distributions as well.
Patching the ACPI tables
This step is the same as the GNU/Linux variant. You extract the DSDT from BIOS/UEFI and patch S3 support in. I will reproduce the original guide bellow, with more clarifications where I felt the need to do so. As usual, I recommend having WSL installed in Windows so that it is easier to follow. There is no point today in using another shell on Windows, since WSL is built-in the OS anyway.
For this part, you will need to boot a live CD of a GNU/Linux distribution. I recommend Ubuntu actually (not Arch), for reasons other than what you might think (you need a single iwctl command to connect to WiFi from terminal which is faster than GNOME anyway, so not this reason) that I will explain in the following part.
Boot into Ubuntu and open a terminal. First, download the required tools:
cd ~
wget https://acpica.org/sites/acpica/files/acpica-unix-20201113.tar.gz
tar -xvf acpica-unix-20201113.tar.gz
cd acpica-unix-20201113
make clean
make
Then, dump your ACPI tables in a directory:
mkdir ~/acpi
cd ~/acpi
sudo ~/acpica-unix-20201113/generate/unix/bin/acpidump -b
You have to decompile the DSDT. To do so:
sudo ~/acpica-unix-20201113/generate/unix/bin/iasl -e *.dat -d dsdt.dat
The decompiled file is called “dsdt.dsl”. Some warnings might be printed in the terminal. This will garble the output file a bit. To fix them, open the file in an editor (gedit, nano etc) and removed the first lines until you find a “/*” beginning of a comment.
Next, there is a patch that you have to apply. I recommend doing it manually as it gives you the chance to look on the DSDT as well. Or, automatically, issue this:
patch -p1 < dsdt.patch
The patch includes 2 changes: firstly, it takes out an “if” statement around the code that advertises S3 which prevented S3 from ever being advertised by the BIOS. Secondly, it removed some unnecessary construct in order to allow the patched table to compile back to binary.
As you can see, no other patch is needed. It turns out, this laptop still has a (mostly) functional S3 implementation built-in, it is just that Lenovo decided to leave it off since Windows provided that S0ix crap anyway and promotes it insistently.
What’s left to do is to recompile the modified table back into a binary:
iasl -ve -tc dsdt.dsl
This will produce a “dsdt.aml” file. This is the modified ACPI table that has to be injected before the OS boots. You’ll need to copy at least this back to Windows, although I recommend keeping everything just in case you messed something up or would like to do further patches on this at a later point.
Injecting the patched table
Here comes the tricky part. Linux can easily inject patched ACPI tables at boot. With Windows, on the other hand, it is a lot more tricky.
I remember doing this some years ago on Windows, after I discovered hackintoshing (installing macOS on PCs) where ACPI tables patching is a basic mechanism to getting it going.
The way it was done back in the day was with some tool called nando’s DIY eGPU Setup, for example. This worked only in Windows installed in CSM mode (BIOS emulation), and allowed patching the ACPI in order to allow eGPUs to run (this was back in the days before Thunderbolt 3 and mainstream eGPU support, when we were doing eGPUs using ExpressCard adapters for example, like the PE4L 2.1b). There were solutions for UEFI as well, but much more fragile.
Nowadays, things have improved quite a bit, besides having a bit more knowledge on the matter. Still, like back in the day, Windows offers the standard way of doing this: you enable test signing (a mode that basically puts your Windows installation in ‘development mode’ and allows unsigned code to run in kernel mode), and load the modified table. This is problematic because:
- it lowers the security of the system; not allowing unsigned code to run is a proven way to strengthen security, especially for users not familiar with computer internals
- it displays a nasty watermark on the desktop to remind you test signing is on; of course, it can be disabled with something like uwd, but still… test signing is still on
- it may cause problems with certain applications
Ideally, a solution that is transparent to the Windows OS is ideal; patching should be done before Windows takes control, and it should not even know the ACPI tables were patched, but also the whole process would have to be kept secure so that it introduces no hidden risk for the user.
For the solution I chose, it is worthy to know a bit about how UEFI works. Basically, the UEFI firmware looks for a dedicated FAT32 partition on each drive called the EFI system partition or the ESP. That partition contains EFI applications (the format is similar to executables in Microsoft Windows) that can be loaded and run in the UEFI. By default, when you choose to boot from a certain device, the firmware actually runs the file at \EFI\Boot\Bootx64.efi. On most computers, this is the Microsoft Windows bootloader, which in turn loads Windows. The Windows bootloader is also located at \EFI\Microsoft\Boot\bootmgfw.efi.
But, one can run any EFI application from any location. To do so, you have to add entries to the boot options menu. To do this, there are a couple of utilities like efibootmgr that can help you do this. This way you could specify an alternative path and run your binary from there. The most useful things to run, besides bootloaders, could be a shell for the EFI partition (like UEFI Shell), memory diagnostics utilities etc.
But running applications unrestricted in UEFI could pose a big security problem: if malware injects itself in the boot process, it has the possibility to detour boot and inject rootkits etc before the system has a chance to boot, or even prevent boot of the legitimate OS at all. With MBR, the BIOS always started executing code from a certain offset on the disk, so malware corrupting the MBR would have the user immediately notice something is wrong. With UEFI, some malicious code could inject before itself before Windows boots, and then boot Windows and an inconspicuous user would not notice something went wrong. Even experts would have a hard time noticing.
To address this problem and further enhance the security aspects of UEFI, the standard proposes Secure Boot. This is a mechanism which ensures all binary coded executed is validated by the previous binary that started it. How does this validation occur? The firmware has a database of keys it checks the binaries to be run against. If the binaries are signed with the keys present in the firmware, the UEFI runs the application. Then, it is the responsibility of the application that was started to maintain the chain of trust. This may sound inherently insecure: what if the started application does not require newly launched applications to be signed? Does that mean Secure Boot gets broken.
Well, yes, it does mean so. This means that whoever has its key installed in the firmware has to be careful and audit what binaries it signs with its own key. Most if not all PCs sold on the market come with Secure Boot enabled and naturally preloaded with Microsoft’s key, so that they can load Windows.
But that’s not mandatory. Most UEFI allows the user to remove the built-in keys and provide their own, since obviously regular users cannot sign binaries using Microsoft’s key. Then, in order to boot Windows or any other binary, the user has to sign them with their own keys that they have generated themselves. As you can see, this is already problematic, because you have to mess with Windows, make sure to resign the binary every time the bootloader might get updated (Microsoft does not know your key so they can’t sign it with your key). While this is certainly doable and even recommended especially for people not running Windows as their main OS, for machines where Windows is the single OS, this approach is not preferred.
So then, what’s left to do? Disable Secure Boot? Well, not really. See, most GNU/Linux distributions got pretty pissed off (and for good reason) when Secure Boot became mainstream and people could not boot and install them because their loaders were not signed by Microsoft’s key. So, a joint effort was developed to conceive a mechanism to work around this but still be secure at the same time.
Enter shim. “shim” is a Microsoft signed preloader. Being signed using Microsoft’s key, it means that it can run by default on most systems. But Microsoft would have not signed it if it did not implement a strong security mechanism. After “shim” is loaded, it looks in the current folder for an application called “grubx64.efi”. It starts it only if:
- it is signed with the key in the firmware, so Microsoft’s key
- it is signed with a key in its internal key database (MOK)
The idea was that the MOK was a secondary database that was to be kept secure by the GNU/Linux vendors. “shim” would contain the keys of the popular distributors; in addition, if a binary’s key was not found in the database, the user is prompted to load the key in the MOK database. This mechanism was conceived because it would not be phesible for Microsoft to sing every (Linux) bootloader out there. Plus, it would potentially artificially slow development on new bootloaders etc.
So, see where I am going here? This solution involves loading shim at boot, instead of Windows Boot Manager. Then, “shim” will load “grubx64.efi”, which will be the application that will inject the ACPI tables and the boot Windows. We could sign “grubx64.efi” with a key we generate for ourselves and load that in MOK instead of the system firmware tables. This also has the advantage that if the user resets the settings in the UEFI, or toggles its state, the keys in MOK are not lost (also, some BIOSes do not even allow overriding the keys in Secure Boot, or even turning off Secure Boot; others don’t let the user disable Secure Boot without deleting the keys stored there first, and then when they enable back, the default Microsoft keys are loaded). In general, I wanted to avoid both the firmware and Microsoft’s implementations and base this method only on stuff we can control ourselves.
In order to inject the ACPI tables and boot into Windows, we have a number of tools that’d let us do that. For example, people had success with kind of similar hacks on Dell laptops (here) using rEFInd. rEFInd can load custom EFI files before it boots one of the operating systems, so an ACPI injector could be one of those applications. But that means we’d have to look for an EFI binary that does specifically that…
On the other hand, there are bootloaders whose features are expressly ACPI patching, because they are mostly used for hackintoshing. An old option is Clover, but this has recently been obsoleted by OpenCore, a modern bootloader that can do a lot of macOS specific stuff, like emulating an Apple T2 security chip and so on, plus… simply booting Windows.
To begin, download OpenCore. Extract this in a structure like this:
- EFI
- OC <- extract in here
- ACPI - leave folder empty for now
- config.plist - create an empty file with this name
- OC <- extract in here
In the OC folder, delete every other folder not listed above. In the ACPI folder, place your DSDT.aml file you obtained from the previous section.
The file “config.plist” will configure our OpenCore installation. Manual configuration is generally pretty laborious, so I’d recommend you grab my custom plist file and change the few bits specific to your own machine. This is not recommended for hackintoshing, because settings in config.plist are patches/workarounds/settings specific for certain architectures. With Windows, you do not have to do a lot of patching, beside injecting that modified ACPI table, as Windows can pretty much boot without trouble on any hardware.
To edit my config.plist, I recommend using ProperTree. The things to note that I have modified besides disabling most of the features this bootloader was originally designed for are:
- ACPI\Add\0\Enabled = true - enable injecting our DSDT, disable the rest
- Misc\Security\SecureBootModel = Default - enforces PC-like Secure Boot as described above (read more here; also, equivalent to “medium security” on Macs, read more here)
- Booter\Quirks\ProtectSecureBoot = true - prevents EFI applications started from OpenCore from chainging the signinging keys loaded in the firmware
- Booter\Quirks\SyncRuntimePermissions = true - with this set to false, you’llm ost like get a BSOD (read more here)
- Kernel\Quirks\CustomSMBIOSGuid = true - this tells OpenCore we need to use a custom SMBIOS which we will disable; SMBIOS is basically the data in the firmware about the computer model, serial number etc (hackintoshes need to emulate real Macs)
- Misc\Boot\ShowPicker = false - disable OS selection during boot; boot directly the first entry or our custom entry which would be Windows
- Misc\Entries\1 - here, we specify the path to Windows’ bootloader; OpenCore can auto scan and populate the list automatically; you could try that first, but I had to type an explicit path here because it always picked my EFI partition as well and never defaulted to booting Windows; the way I ended up setting it is that I disabled OpenCore’s scanning and specifically stated the thing to boot here; you have to supply the full path to the drive containing the EFI partition, like in the example; to get that, boot the EFI application UEFI Shell which shows you the paths for all connected drives when it starts up
- Misc\Security\ScanPolicy - keep the default to disable scanning for most stuff, altough not all; determine other values by consulting the documentation for OpenCore; set to 0 to enable auto detection of all drives and OSes, including Windows
- PlatformInfo\Generic\UpdateSMBIOSMode = Custom - crucial, so that OpenCore does not inject different info about our motherboard etc to mimick a Mac (this is problematic because you lose Windows activation with this)
Please read the full documentation of OpenCore at any time if you have more questions or would like to learn more about the options I presented above, and also maybe help me out if I missed or misinterpreted something.
Fine, now let’s get the last pieces. In the EFI\OC folder, you’ll need to have 3 files:
- shimx64.efi - this is the shim bootloader; you need a variant signed with Microsoft’s key; I got mine by extracting it from the Debian package here
- mmx64.efi - this is the MOK manager utility which shim will load when it won’t find a key for our self signed binaries, get this by extracting it from the Debian package shim-helpsers here
- OpenCore.efi - this is the OpenCore bootloader that once we load our key into MOK, will be loaded by shim
Next, it is time to create our own key and sign OpenCore.efi with it (remember, shim and mm are signed with Microsoft’s key, same is Windows Boot Manager).
openssl req -newkey rsa:4096 -nodes -keyout MOK.key -new -x509 -sha256 -days 3650 -subj "/CN=your name/" -out MOK.crt
openssl x509 -outform DER -in MOK.crt -out MOK.cer
sbsign --key MOK.key --cert MOK.crt --output grubx64.efi OpenCore.efi
Don’t worry about the generated warning. Also, if you need to remove the signature from an already signed binary, do this:
sbattach --signum 1 --remove application.efi
Now that this is done, it is time to place these files in the EFI system partition. To mount it in Windows, open an administrative command window and type:
mountvol b: /s
Due to the security model of Windows, you won’t find it mounted in regular Windows Explorer window. Only administrative windows can see it. My solution is to open Notepad as administrator and browse the files using the Open file dialog. Of course, you can use the command line in Windows. You have to place the OC folder in the EFI folder on the ESP. Also, make sure to copy MOK.cer to the EFI system partition; you will need to enroll it in the MOK at next boot; after that, you can delete it (and I recommend doing so) from the ESP.
What’s left is to add an entry for the newly added shim executable to the boot menu. Again, boot back in Ubuntu and use efibootmgr as described here:
efibootmgr --disk /dev/nvme0n1 --part 1 --create --label "shim" --loader /EFI/OC/shimx64.efi --verbose
Also, since you are here, here’s how you can view and reset the MOK database:
mokutil -l
mokutil --reset
mokutil is available in Arch only via AUR, so with a live CD it means you’d have to install an AUR wrapper, compile it, hopefully it still compiles and so on. Ubuntu ships it by default, that’s why I recommended you use an Ubuntu live CD if you anyway do not have any GNU/Linux distro installed.
When you issue the reset command, mokutil will prompt for a password. Type any password there. In order not to compromise the security model of shim, the actual reset does not happen while in Linux, in user space. Instead, at next boot, MOK will prompt the user to confirm the reset operation by supplying the password they set.
So, now that you create the boot entry, remove and make sure the BIOS/UEFI boots from it. A blue screen should pop up telling you that a key for the application to be run was not found. From there, enroll your custom MOK.cer key you stored on the ESP and reboot. If everything went well, shim will then successfully boot OpenCore which in turn should start the Windows Boot Manager which will load Windows.
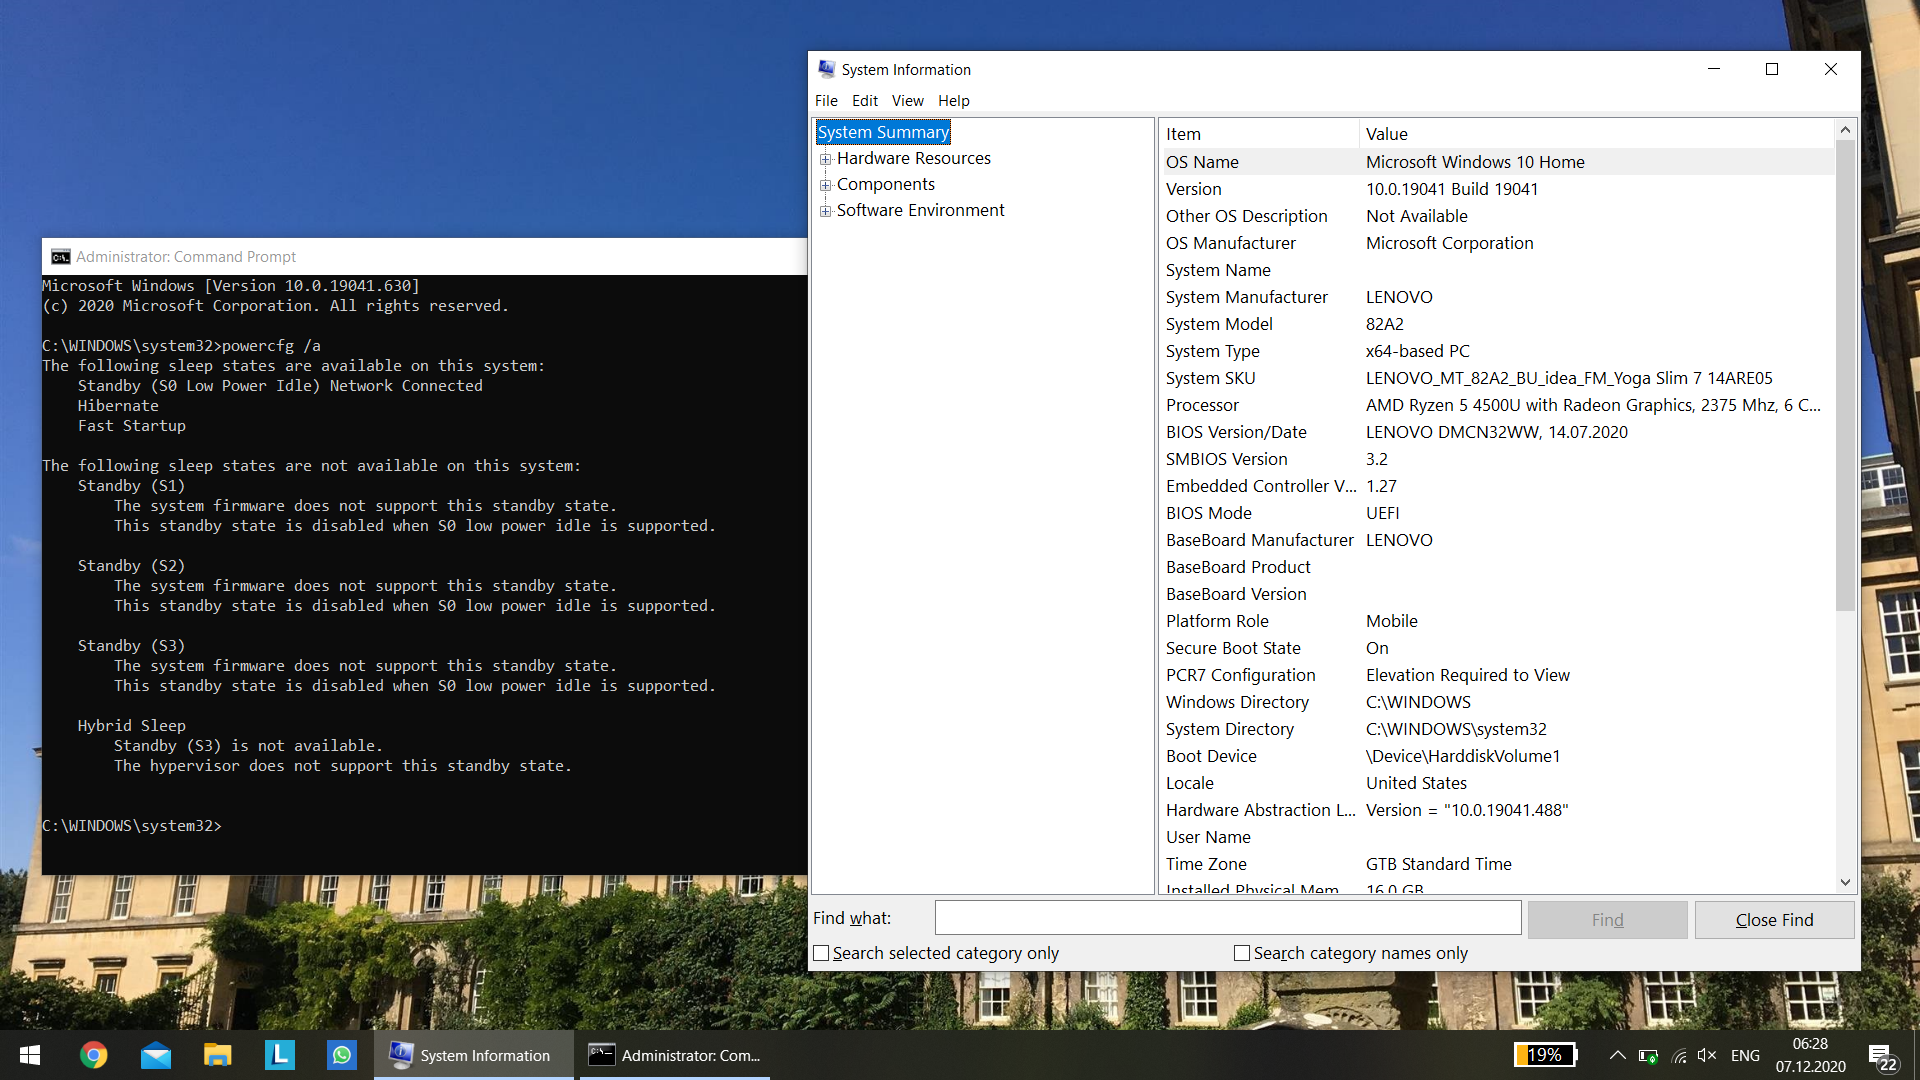
You’d expect that’d be it, but no so fast. As we talked previously, your system still reports support for S0ix, it is only that now it also advertises support for S3. When Windows encounters this, it still disables S3 and prefers S0ix. For this to fully work, we now need to disable modern standby, since we now have S3 as a fallback (you can disable modern standby without a patch, but you won’t get S3 back; Windows simply won’t be able to sleep at all, since BIOS does not advertise S3). If you open an administrative command window and type:
powercfg /a
You can confirm what I have said above.
Windows with patched DSDT for S3 support
Now, to disable S0ix support, there are 2 ways I know of:
-
People have taken AcpiS0ixPatcher and reversed it so that it zeros the bit responsible for enabling S0ix instead of setting it to 1. An already binary that does this is provided by the author in this, specifically here. The problem with this is that on AMD Renoir 4000-series laptops, as reported there and on Reddit here, this blue screens Windows; no one knows exactly why, Windows reports something about the AmdMicroPEP.sys driver crashing. Plus, you’d still have to chainload that, sign it with your key etc. Too much work unless an alternative solution exists.
-
Fortunately, there is an alternative way, and this time it comes from Microsoft: there is a registry setting that is lightly mentioned here that allows you to disable modern standby. It is designed for IoT devices they say, but it works on client Windows as well. So, merge this into the registry:
Windows Registry Editor Version 5.00

[HKEY_LOCAL_MACHINE\SYSTEM\CurrentControlSet\Control\Power]
"PlatformAoAcOverride"=dword:00000000
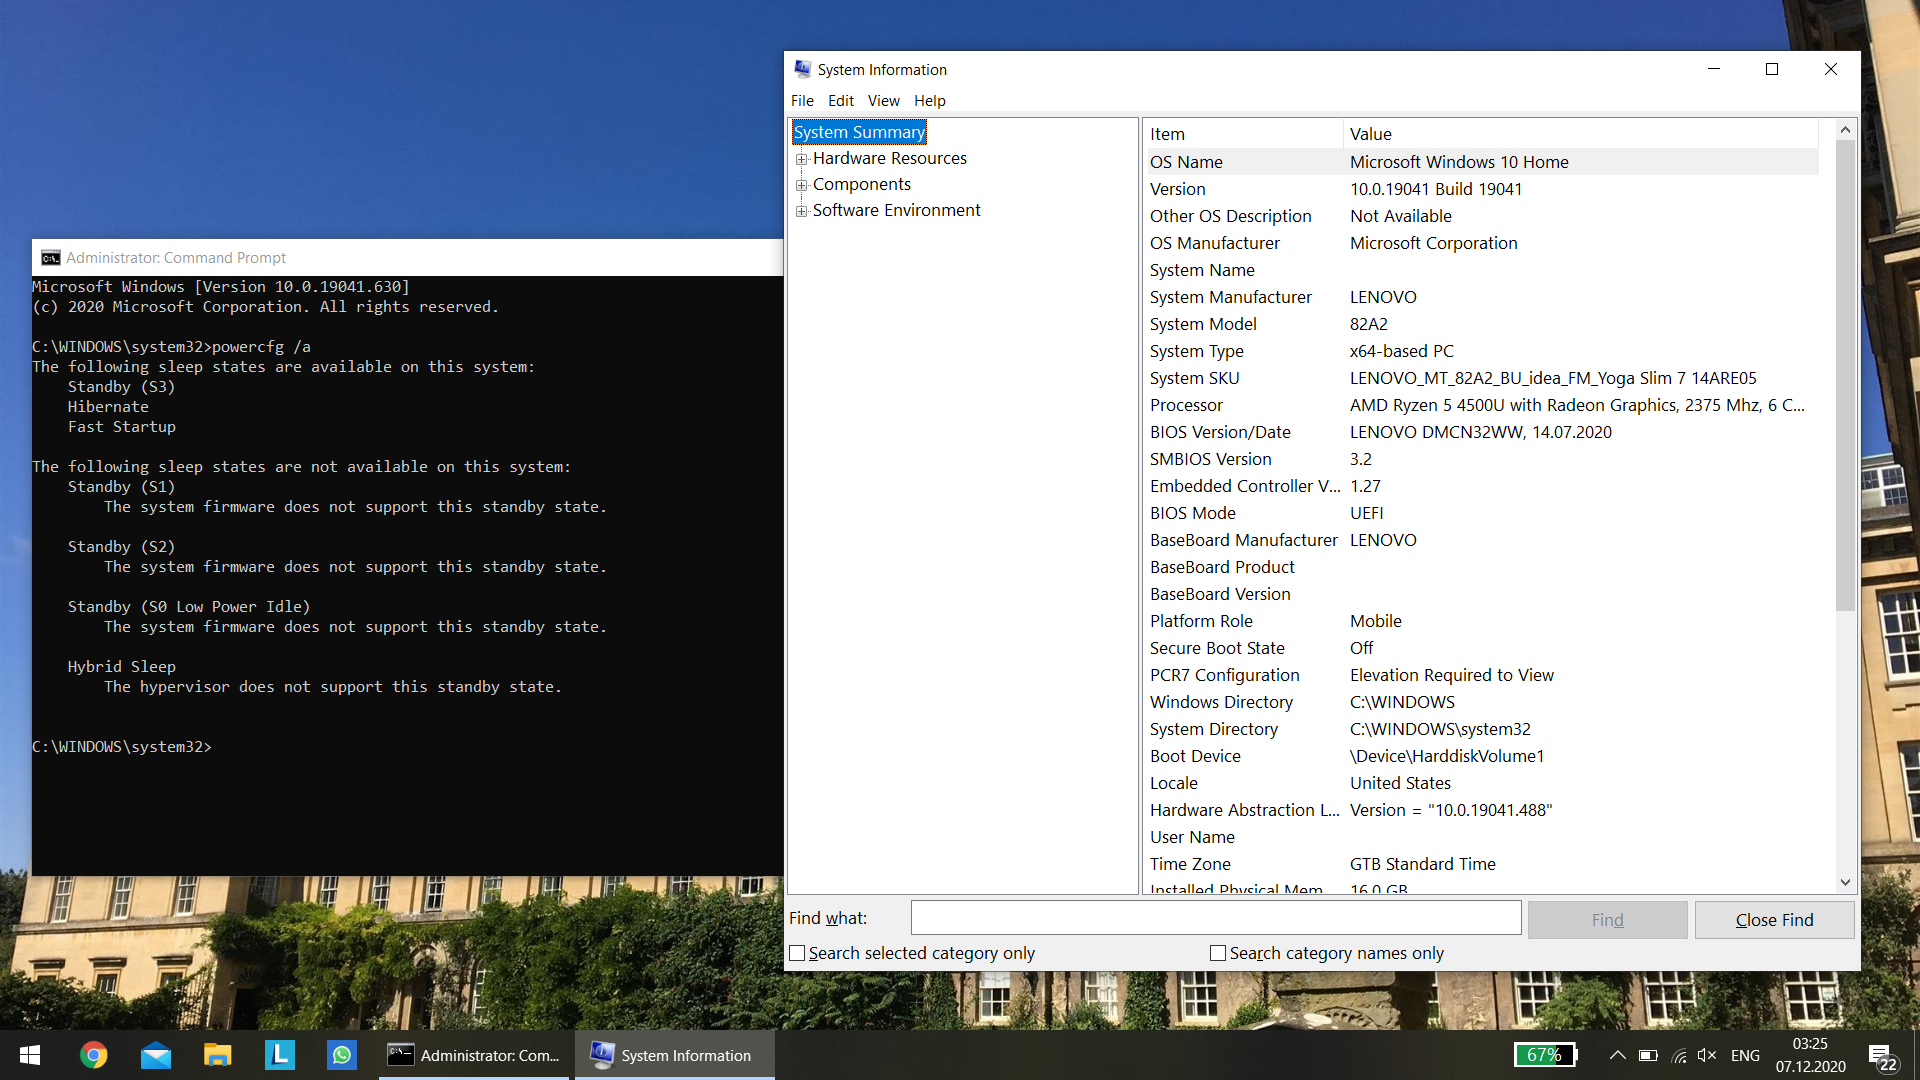
Reboot. Only now, finally, you can confirm that everything works as expected by issuing again this command in an administrative command window:
powercfg /a
If Windows reports S3 as supported, then it means the patched DSDT is active and it worked.
Windows with patched DSDT and PlatformAoAcOverride for S3 support
As last mentions, there are still some rough edges. You see, midway during development for this laptop, Lenovo got lazy and they have not finished implementing S3 thoughtfully. Instead of proper support, they just disabled it and rely on Microsoft’s abomination. Do not these:
- When waking from sleep, the monitor does not turn back on. You have to press a key or move the cursor.
- When waking from sleep, the keyboard backlight is not restored. It is remembered, but the light simply won’t be on if you had the backlight on when you put the laptop to sleep.
- When waking from sleep, the power indicator may remain breathing on certain occasions.
- Also on certain occasions when waking from sleep, the fan may remain on; to revert it to normal, resleep and wake the laptop again.
- When you close the lid and the laptop goes to sleep, when opening back the lid the laptop does not wake automatically (it powers on if it was off, or resumes from hibernation if it was hibernated; that’s BIOS default behavior); for S3, they simply forgot to put this in the BIOS probably, so when opening the lid, you also have to press a key or the power button to wake the computer from sleep
- This is in general on this laptop: you can’t disable wake by pressing keys on the internal keyboard, as the Power management tab on the “Standard PS/2 Keyboard” is missing in Device Manager and toggling wake events for it via the command line does not work either
There may be other things as well, I did not have much time to investigate more. I am very glad it works as well as it does, considering that really, the vendor has not actually finished working on it. Ideally, I or someone else would revisit the dumped DSDT and attempt to fix it. Unfortunately, I did not have time at the moment, plus, it is not my laptop, so it is pretty hard for me to test.
As for my brother, he listened to me explaining him all of this, and he is certainly grateful that I attempted a fix and researched this for him. But he told me that honestly, he’ll stick with the behavior I proposed him initially, in hibernating the computer when closing the lid, pressing the power button etc instead of sleeping (which was S0 low power idle) before. And to be honest, I can’t judge him, I appreciate the honesty and have to tell you, I’d do the same, because:
- hibernation actually wastes on energy, the computer is entirely off
- this computer boots very fast, having very fast storage, waking from hibernate is almost the same as waking from sleep
- it is properly supported by the BIOS/UEFI OOB (out of the box)
Unfortunately, the sad state of affairs is that further work is required to support S3 fully and properly. One has to implement what Lenovo skipped from implementing in the ACPI tables. The unfortunate situation today is that computers simply ship with these broken BIOSes nowadays and one has to simply employ all sorts of ultimately stupid workarounds to fix the situations. For me, doing this was an exercise to learn this stuff, I took it like that.
Also, a stupid consequence of this OEM and Microsoft fiasco is more problematic if you want to run a GNU/Linux distribution. There, S0ix performs very badly, but it is true that proper functioning on wake up could be achieved from software as well. It is certainly more flexible than Windows. Or, same as in Windows, you can resort to hibernation in GNU/Linux as well, which at least works excellent on this machine. the laptop comes with an Insyde H2O BIOS/UEFI, which on all computers that I used that had one, despite lacking more advanced options, at least it is reliable and boots fast. My ThinkPad T470/25 barely makes it past POST in the time this boots to the desktop. And POST does not depend on NVMe/SSD/CPU speed, it is just the BIOS/UEFI that is slower because it is “enterprise”. No, really, this Lenovo laptop is pretty great in general, except its keyboard which has inexistent key travel and this issue we talked about here. But still it is the best AMD Renoir laptop this year so… yeah, either this or the MacBook Air M1 I guess =))
Thank you for sticking until the end, please share your thoughts below.